Powered by Blogger.
  • Home
  • Recipes
    • Baking Recipes
    • Dinners
    • Holidays
  • Product Reviews
youtube facebook Pinterest google twitter instagram

Kimberly's Gluten-Free Kitchen

I'm back! It has been so long since I have done a post and it feels good to get back at it. I have been taking some classes these past few months and since my kids, along with all of yours, are home right now, it made doing anything extra impossible. As soon as I took my last final, I couldn't wait to get into the kitchen. I have been dreaming about what I was going to make and I came up with these scrumptious Christmas cookies.  They are everything good and delicious about Christmas packed into one cookie. They have gluten free chocolate sandwich cookies, mini marshmallows and crushed candy canes. They taste amazing and they are just packed with delicious Christmas flavors.
I don't know about you but I have lots of helpers in my kitchen. The minute my kids hear the mixer start, they all run into the kitchen and want to help. Sometimes I love it and sometimes all I want to do is hide in my kitchen and bake just the way that I want to. My kids especially love to help during the holidays and that gets hard when there is so much baking to do. I thought these cookies would be perfect to have a little extra help with.  Kids will love making these cookies and they aren't too hard to make with little helpers. My kids loved helping me crush the cookies and candy canes and thought that was just the best. The candy canes make them look like Christmas cookies without getting tubs of frosting out and having frosting from one end of the house to the other. These are simple but delicious Christmas cookies that are just as much fun to eat as they are to make!

I have seen a version of these cookies with white chocolate chips in them and that would be great to add instead of the marshmallows if you are a white chocolate fan. I just never got on the white chocolate band wagon so I thought that mini marshmallows would be so fun and it would make them nice and gooey. I was so right! The marshmallows melted in the oven and just gave the perfect amount of ooey gooey to these cookies. The marshmallows do make them spread a little bit in the oven so when I took them out, I just used a knife to bring them back together. 
I love the idea of a cookie within a cookie. I thought the gluten free chocolate sandwich cookies would be so good in these. They add a bit of chocolate to them and some fun texture. They just made the perfect addition along with the candy canes. It is just a subtle peppermint flavor to make them really feel like Christmas. The vanilla pudding mix makes these cookies so soft and delicious but they still hold their shape and are sturdy. I think these cookies are the absolute perfect Christmas cookie. I really couldn't think of another name for them because they just remind me of Christmas. Check out the video to see exactly how I made them!
Gluten Free Christmas Cookies
Print

Gluten Free Christmas Cookies

Yield: 36 cookies
Author: Kimberly Llewellyn
Prep time: 15 MinCook time: 12 MinTotal time: 27 Min
These Christmas cookies are packed with all things that Santa loves. They have marshmallows, chocolate sandwich cookies and candy canes. They are sure to be a hit during the holidays and the best thing is that they are gluten free for all to enjoy!

Ingredients

  • 1 cup unsalted butter, softened
  • 3/4 cup brown sugar
  • 1/4 cup granulated sugar
  • 1/4 cup vanilla pudding mix
  • 2 large eggs
  • 1 teaspoon pure vanilla extract
  • 2 1/2 cups 1 to 1 gluten free flour blend
  • 1 teaspoon baking soda
  • 1/2 teaspoon salt
  • 1 cup chopped gluten free chocolate sandwich cookies
  • 1 cup mini marshmallows
  • 1/2 cup crushed candy canes

Instructions

  1. Preheat oven to 350 degrees F. Line a baking sheet with parchment paper.
  2. In the bowl of your mixer,  add butter and sugars. Beat until creamy, about 2 minutes. Add vanilla pudding mix, eggs and vanilla.
  3. In a medium bowl add the gluten free flour, baking soda and salt. Whisk together until combined.
  4. Add the dry ingredients slowly to the wet ingredients until fully combined. Stir in gluten free chocolate sandwich cookies, mini marshmallows, and crushed candy canes.
  5. Drop cookie dough in rounded tablespoons onto prepared baking sheet. Bake for 10-12 minutes until slightly golden along the edges of the cookies. Remove cookies from oven and let cool slightly before removing and transferring to a cooling rack to cool completely. 
  6. Serve and enjoy. Store in airtight container.
Did you make this recipe?
Tag @kimberlysglutenfreekitchen on instagram and hashtag it #glutenfreechristmascookies
Created using The Recipes Generator
December 15, 2020 No comments
I love finding new products and new companies that make life easier for people on the gluten free diet.  I was recently contacted by a company called OMGF! Meals who offer gluten free meal kits.  I thought this was a great idea and couldn't wait to check out their products.  I went on their website https://www.omgfmeals.com/ and found many products that I was itching to try out.  One of the hardest things to bake gluten free is bread. It can be difficult and time consuming.  This company takes the headache out of baking gluten free and delivers you the exact kit to make your own perfectly baked bread at home.  
The owner of this web based company has suffered from Crohn's Disease and then was diagnosed with Celiac so they really know what they are doing.  I appreciated the fact that they were part of this community and really wanted to provide quality products to people on the gluten free diet.  I think it is very important to support businesses like this so I was over the moon to get my first kit in the mail.  I ordered the Golden Challyeah because it was their most popular bread and I couldn't wait to give it a try.
The kit came with very detailed directions that were easy to follow. It also came with most of what you needed, all you needed was the wet ingredients, like eggs, honey, water, and butter.  I had all of this in my fridge and pantry so there was no need to make a run to the grocery store.  I just followed the recipe card and the result was this perfect and delicious loaf of bread.  It smelled amazing while it was baking and I couldn't wait to taste it.

After cooling, I popped it out of the tin and had a taste.  It was amazing! It was soft and spongy but still held it's shape.  It didn't crumble or fall apart when I cut it (which I really hate when that happens because you know it's not going to taste good.)  This was the perfect consistency when you bake gluten free bread.  I was very happy with the results and I would definitely recommend this kit to anyone looking for some fresh baked bread.  The flavor was scrumptious as well and my whole family dove into this bread as soon as they could.  We ate the whole loaf in one day and it was a pretty big loaf!  Considering I am the only one gluten free in my house, that is saying something. 
I would absolutely recommend this gluten free bread kit to anyone that loves to bake or even those that are new to gluten free baking.  With the easy to follow recipe, anyone can make this delicious bread at home. I also ordered the Bomb.com Naan bread which I am so excited to make next.  I just think these kits are great and anyone that is gluten free should check them out.  Check out OMFG! Meals for some great kits to make your gluten free life easy and more delicious!
July 30, 2020 1 comments
If you read my blog or follow me on Facebook or Instagram you know that I live in Southern California.  During the summer months here, it is hot. Like super hot and I am constantly trying to find ways to keep cool and enjoy the warm weather.  My kids love ice cream sandwiches, Popsicles and really anything frozen.  I am always so jealous when they get to eat an ice cream sandwich because it just reminds me of when I was younger and would eat them sitting by the pool.  The other day I was having the very same thoughts as my kids were enjoying some and I decided that I would make some gluten free ones and enjoy them myself. I am so glad that I did because they were amazing and really hit the spot.  
 These might seem like they take a long time and they do but that is just freezing time.  You really want to make sure that your ice cream is firm when you cut the sandwiches or they will turn into a mushy mess.  Having the ice cream firm will make them so much easier to work with.  When you pull them out of the freezer, make sure you work fast because they melt a lot faster than you might think they will.  If they get too melty, just pop them back in the freezer for a few minutes so that you can work with them. I did let the ice cream get soft when I spread the ice cream over the cookie slabs.  It makes the ice cream more spreadable if you leave it out for a few minutes.  After you get that ice cream spread, you have to get it back in the freezer quickly.  This is the most frustrating part of the whole thing because ice cream just can't be out for long until it turns into liquid.
 I wanted to get the cookie a bit thinner than they turned out but having the cookie a bit thicker made it easier to work with.  It becomes really brittle when too thin so that is why the cookie part is as thick as it is.  I ended up cutting the sandwiches a bit smaller and added more ice cream in between to offset the thickness of the cookie part.  You can play with it to find how you like it but I cut them pretty small because I have kids and I didn't want them to have too much or eat one and not be able to finish it.
 These were so fun to eat and my family all ate them sitting by the pool after a fun afternoon of swimming.  It was such a refreshing and delicious snack.  They also keep really well because they have to be frozen, so just wrap them individually and keep them in your freezer for when you need a sweet treat. It has been a really long time since I have eaten an ice cream sandwich but they were just as good as I remember them. My kids say they are now spoiled and just want homemade ones instead of the store bought ones.  They absolutely loved them and we all had a great time eating them.

You can use any type of ice cream that you want.  I made them with vanilla and chocolate chip ice cream.  Just make sure that you are using gluten free ice cream.  You can make your own ice cream but I didn't have enough patience to do that so I just got store bought.  They would be so good with so many different flavors and you can really have some fun putting together different flavor combinations then just the traditional vanilla.  These little treats were so fun and so delicious to make. Just make sure that you make them a day or two before you need them because there is quite a bit time to freeze.  Hope you enjoyed this recipe and I love to hear from you so comment and let me know if you made them and how they turned out!


Gluten Free Ice Cream Sandwiches
Print

Gluten Free Ice Cream Sandwiches

Yield: 24 ice cream sandwiches
Author: Kimberly Llewellyn
Prep time: 15 hourCook time: 10 MTotal time: 15 H & 10 M
These cold and delicious sandwiches are just what you need to cool down during the warm summer months.

Ingredients:

  • 1 1/4 cups gluten free 1 to 1 flour blend
  • 1/2 cup Dutch-process cocoa powder
  • 1/2 teaspoon baking soda
  • 1/2 teaspoon kosher salt
  • 6 tablespoons unsalted butter, softened
  • 1/2 cup granulated sugar
  • 1/4 cup light brown sugar
  • 1 teaspoon pure vanilla extract
  • 2/3 cup whole milk
  • 2 pints/1 quart gluten free ice cream of your choice

Instructions:

  1. Preheat the oven to 350 degrees F. Lightly grease a 13" x 18" rimmed baking sheet and line it with parchment paper.
  2. Whisk together the gluten free flour, cocoa, baking soda, and salt; set aside.
  3. In the bowl of your mixer, beat together the butter, sugars, and vanilla  until well combined and somewhat expanded; the mixture will look a bit grainy, but also fairly creamy.
  4. On low speed, add half the dry ingredients; then the remaining dry ingredients, scraping the bowl between additions.
  5. Spoon the batter into the prepared pan that is lined with parchment paper. Use a spatula to spread it to the edges of the pan, smoothing it as flat as possible. 
  6. Bake the cookie slab for about 10 minutes, until it just loses its shine. Remove the pan from the oven, and cool the cookie on the pan for about 5 minutes. Cut in half crosswise to make two rectangles. Trim the edges of each rectangle, if desired; you'll make neater looking sandwiches.
  7. Use a fork to prick the top of the cookie slabs in neat rows, like the top of the traditional ice cream sandwich.  Place the cookie slabs on a rack to cool completely. When completely cool, wrap well and place in the freezer.
  8. To assemble the ice cream sandwiches: Peel the parchment off the backs of the cookie slabs. Place one slab, bottom up and spread with ice cream. Top with the second cookie slab, top side up. Press down firmly to distribute the ice cream evenly between the cookie slabs. Place in freezer for at least 8 hours.
  9. Use a sharp knife to trim the edges of the sandwiches, if necessary. Cut the large cookie slab into individual sandwiches and wrap well in plastic wrap and freeze until firm and ready to serve.
Did you make this recipe?
Tag @kimberlysglutenfreekitchen on instagram and hashtag it #glutenfreeicecreamsandwiches
Created using The Recipes Generator
July 08, 2020 No comments
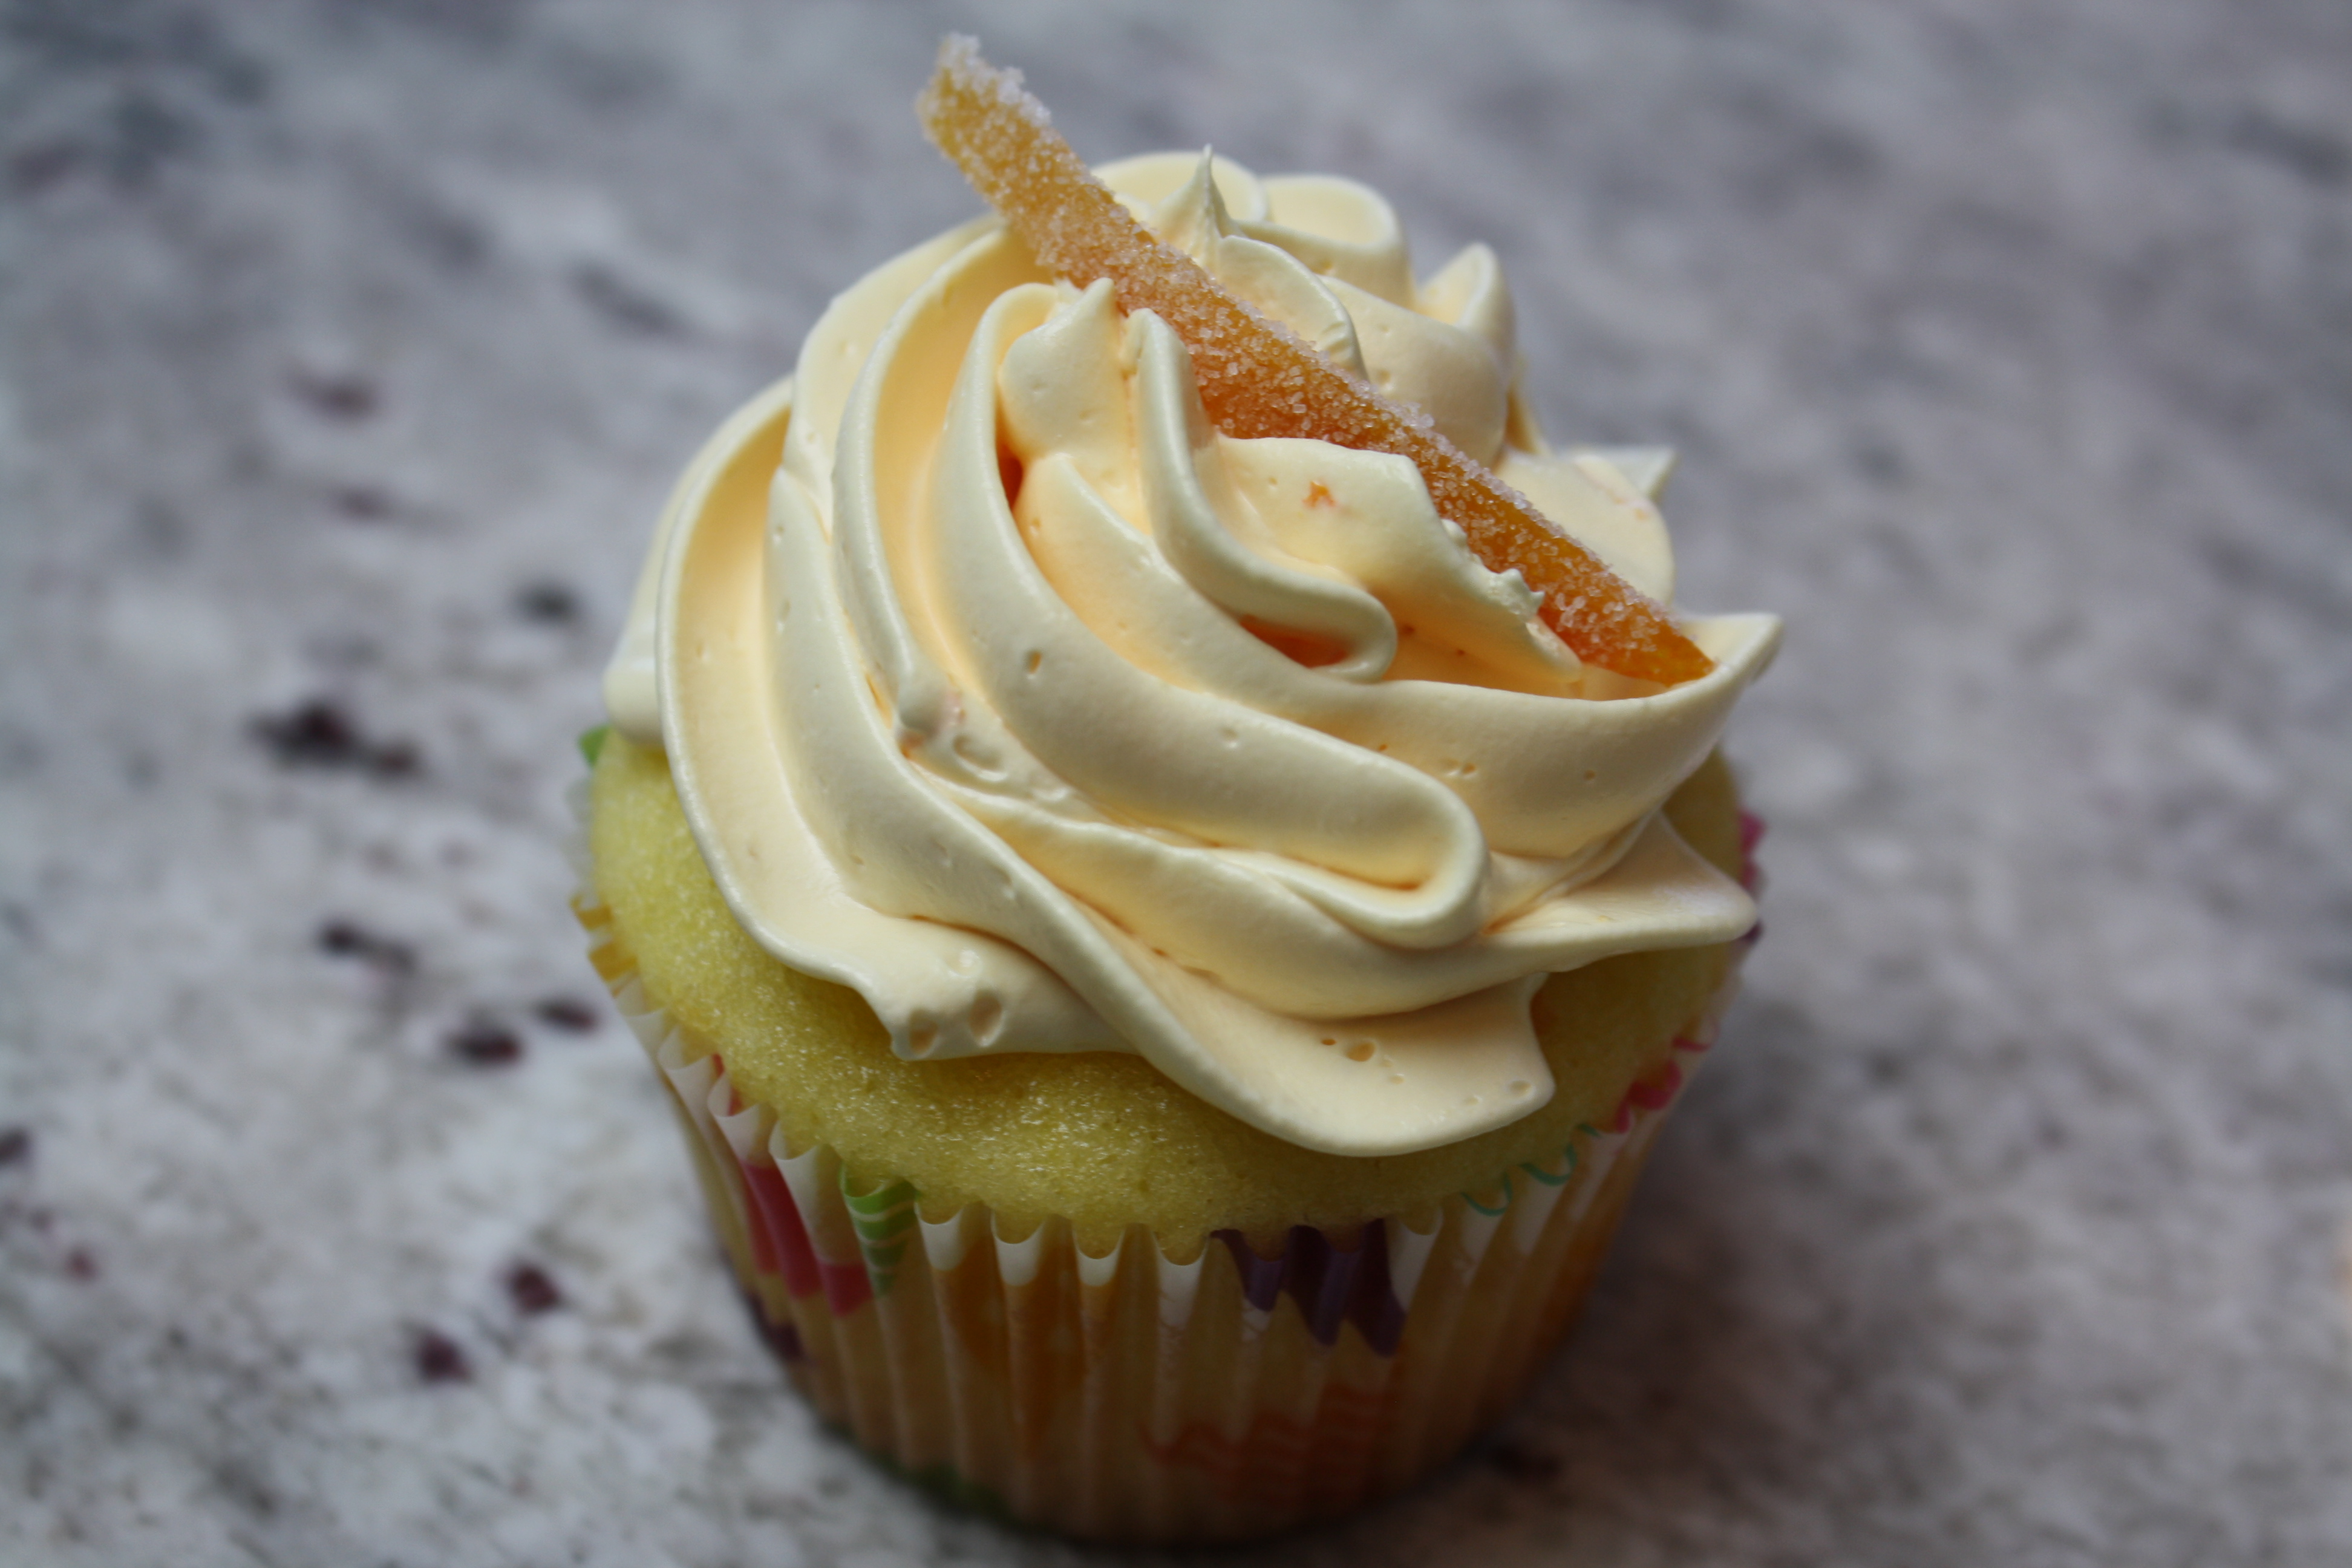
So my husband is obsessed with fruit trees. We have a fairly small backyard but it is packed with all kinds of different trees.  We have 4 different orange trees and this year we got hundreds of oranges off of them.  My family loves them so much but since we had so many this year, I found myself trying to find different things to use them up before they went bad.  One day I was talking to my oldest son about what we should bake this week and he came up with orange cupcakes with orange frosting.  I thought it was the perfect idea and I set out to make these amazing cupcakes.
Orange is such a subtle and not very strong flavor so you really need to add a lot of zest in order to be able to taste the orange in these cupcakes.  I just love these because I think they just taste like springtime and they are just the perfect dessert for this time of year. The cake is just perfectly light and fluffy with just a hint of orange.  They are so well balanced and I didn't think that an American buttercream would be the right pairing for these because of how light and fluffy they are.  I thought that a Swiss Meringue Buttercream would be absolutely perfect because it is just so equally light and fluffy.
 If you have never made or eaten Swiss Meringue or Swiss Meringue Buttercream then you are missing out.  This frosting is life changing and I mean that, with every fiber of my being.  This frosting is like none you have every had before.  The first time that I made it was a few months ago and I about died.  It was pure perfection.  I always shied away from it because it just looked so complicated but I found that it really isn't.  It's actually quite easy to make and it is so good.  It is the best frosting that I have ever had.  I didn't know that frosting could be that light and delicate while still having so much flavor.  It is simple amazing and I just want to shout it from the rooftops!
 I made these awhile ago for my husband's family and his aunt was visiting.  She told me that these were the very best cupcakes that she has ever had.  She is not gluten free and she wasn't saying that to just make me feel good.  I could tell that she liked them that much.  They really are just the perfect cupcake.  I also candied some orange peel to put on the top and they were so good.  I've also never made candied orange peel before but it was also something that was not difficult to make either and added a lot to the cupcakes.  The orange peels were the perfect decoration for these cupcakes and a sweet addition.
I know I said it before but these cupcakes are really the perfect cupcake.  If you ever just learn how to make one cupcake, these should be them. You can also just make a cake and it would be amazing.  They are really perfect to bring to any party or get together and trust me, everyone will be singing your praises and they won't believe you when you tell them that they are gluten free!

Gluten Free Orange Cupcakes with Orange Swiss Meringue Buttercream


Gluten Free Orange Cupcakes with Orange Swiss Meringue Buttercream
Yield: 18 cupcakes
Author: Kimberly Llewellyn
Prep time: 40 MCook time: 25 MTotal time: 65 M
These cupcakes are light a fluffy and full of that delicate orange flavor. The orange swiss meringue buttercream is silky, fluffy and is the perfect companion to these cupcakes.

Ingredients:

Cupcakes
  • 1 package (15 ounces) yellow gluten free cake mix
  • 1/4 cup sugar
  • 2/3 cup plus 1 tablespoon orange juice (fresh or from the carton)
  • 8 tablespoons unsalted butter, at room temperature
  • 3 large eggs
  • 1 teaspoon pure vanilla extract
  • 1 teaspoon orange zest
Orange Swiss Meringue Buttercream
  • 4 egg whites
  • 1 1/2 cups granulated sugar
  • 1 1/2 cups unsalted butter, room temperature and cut into tablespoons
  • 1 teaspoon pure vanilla extract
  • 1 teaspoon orange juice
  • 1 tablespoon orange zest

Instructions:

How to cook Gluten Free Orange Cupcakes with Orange Swiss Meringue Buttercream

Make the Cupcakes
  1. Preheat the oven to 350 degrees F. Line 18 cupcake cups with paper liners and set pans aside.
  2. Place the cake mix, sugar, orange juice, butter, eggs, vanilla, and orange zest in a large mixing bowl and beat with a mixer on low speed until the ingredients are just incorporated, 30 seconds. Stop the machine and scrape down the side of the bowl with a rubber spatula. Increase the mixer speed to medium and beat the batter until smooth, 1 to 1/2 minutes longer.  Spoon or scoop the batter into the lined cupcake cups, filling each two-thirds full. Remove any unfilled paper liners.
  3. Place pans in the oven side by side and bake the cupcakes until the tops spring back when lightly pressed with a finger, 15-17 minutes.  Transfer the pans to wire racks and let the cupcakes cool for 5 minutes. Run a dinner knife around the edge of the cupcake cups and transfer the cupcakes to wire racks to cool completely before frosting, 20 minutes longer.
Make the Buttercream
  1. Place egg whites and sugar in a metal bowl of a stand mixer. Place the bowl over a pan of simmering water, not touching the water. Whisk or stir constantly until the sugar is dissolved and the mixture comes to appoximately 160 degrees F. If  attempting without a thermometer, sugar should be dissoved with no graininess when a bit is rubbed between two fingers. It will be hot to the touch.
  2. Immediately place the bowl on the stand mixer and whip on high using the whish attachment until frosting has become thick and glossy, forming a stiff peak. Continue to whip frosting until the bowl feels room temperature to the touch, a total of about 10 minutes. 
  3. Switch the whisk attachment to the paddle attachment. With the mixer on low, drop butter, 1 tablespoon at a time, beating until smooth after each addition. If frosting appears curdled or clumpy at any time, increase speed to medium-high and beat until smooth.
  4. Once all the butter has been incorporated, mix in extracts, orange juice and zest.  If desired, add food coloring to desired shade. If needed, continue beating until smooth.
  5. Spoon or pipe frosting onto each cupcake, covering the top. Place frosted cupcakes on a serving plate.

Did you make this recipe?
Tag @kimberlysglutenfreekitchen on instagram and hashtag it #glutenfreeorangecupcakes
Created using The Recipes Generator
March 30, 2020 2 comments
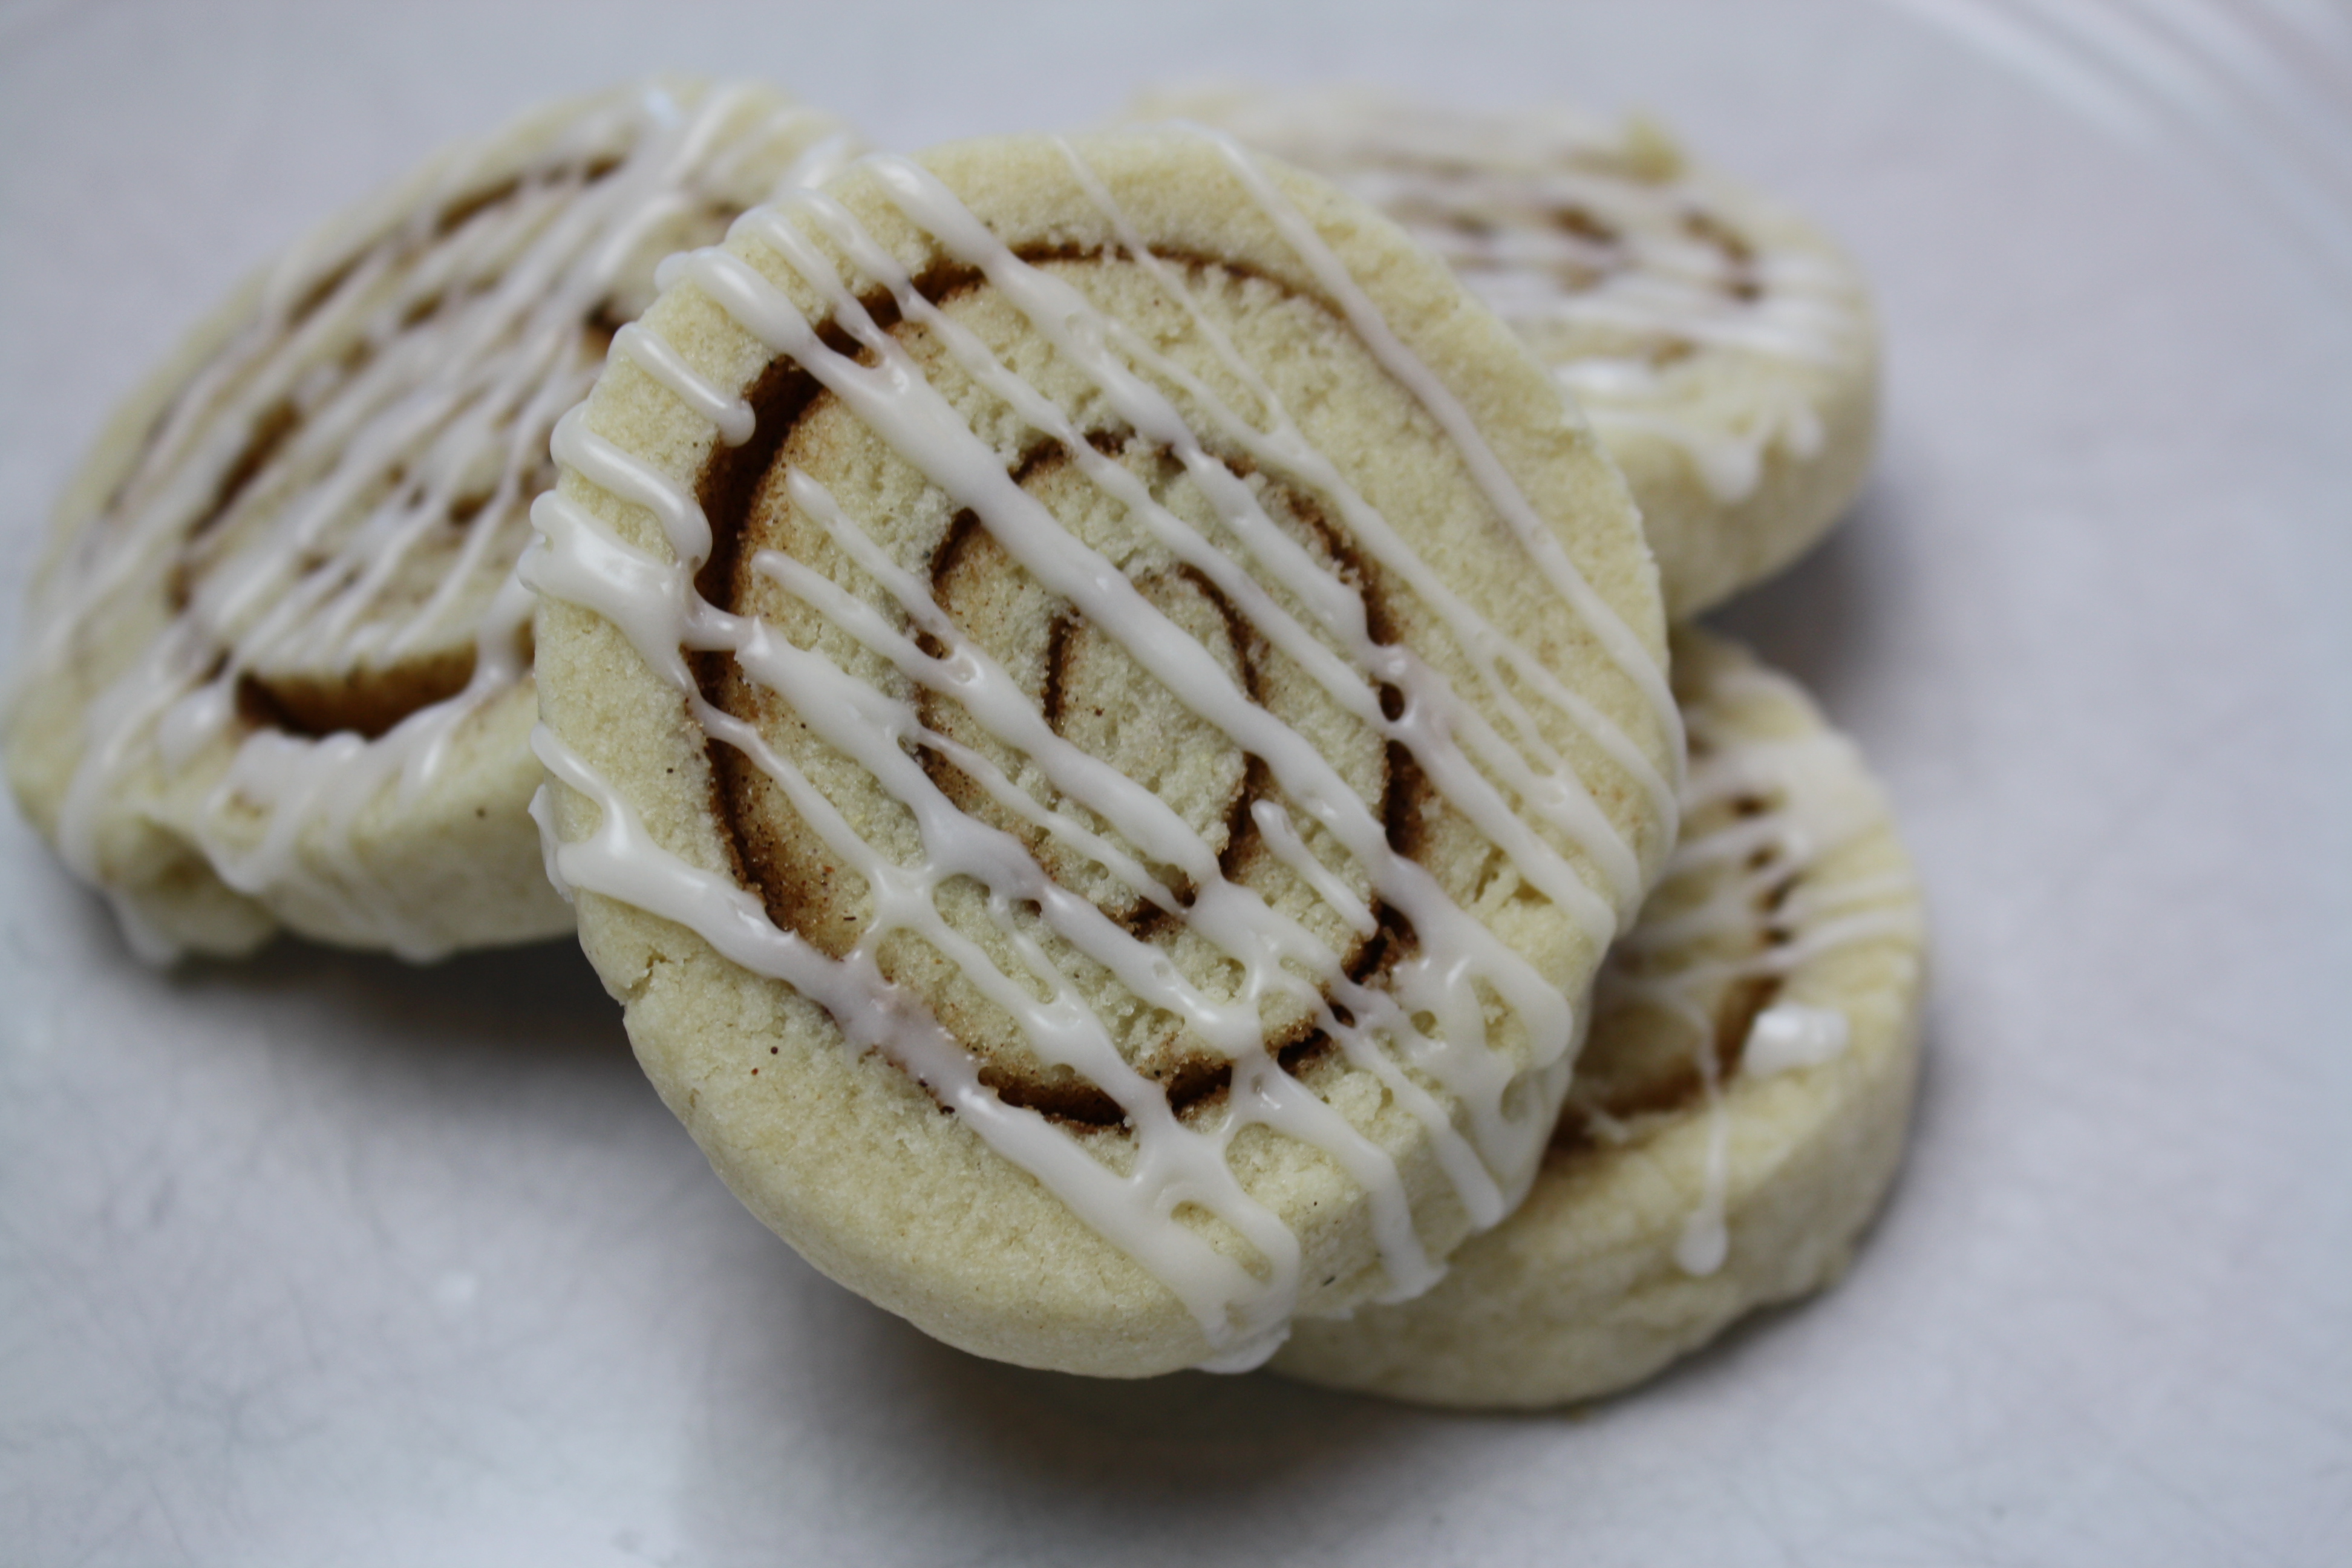
I am a huge fan of cinnamon rolls.  One of my very favorite memories growing up was that when we were shopping at the mall, my mom and I would always stop by Cinnabon and get a cinnamon roll to share.  It was just the two of us and I loved that time together.  Well, the days of getting cinnamon rolls in the mall are long over for the both of us as we both have Celiac but that hasn't altered my love of them.  One of the first things that I wanted to conquer when I decided to start a blog was cinnamon rolls.  I am pretty happy with my recipe that I created a few years ago and if you are looking for a good one my gluten free cinnamon roll recipe is absolutely delicious.  I just love the flavors and when I was thinking about cookies for the holidays, I thought a cinnamon roll cookie would be perfect. 
If you have worked a lot with gluten free flour then you know that it is not as strong or as workable as regular wheat flour.  Gluten is what makes the wheat flour so stretchy and strong so when you are trying to work without that gluten, it can make things quite difficult.  Sometimes it can break easily, fall apart to just disintegrate in your hands. (I have had all those happen to me.) I wanted to make sure this dough would hold up and would work when you tried to roll it up because I wanted them to look like a cinnamon roll.  I was really pleased with how these turned out.  They have a great swirl and it wasn't too difficult to roll them up.  In this recipe you need to chill the dough twice and you really don't want to skip those steps.  Chilling the dough keeps it firm for when you are rolling it out and cutting them out.  You really want the dough to hold it's shape so that it is easier to work with. I also rolled them out on a piece of parchment paper which I really recommend doing.  It made it much easier it roll up and I used parchment paper to get a tight roll.  If you just rolled them out on the counter, it might not work and you might be stuck with a very big mess.  Just watch the video down below if you need any help with that part.  
The glaze for this cookie really makes a big difference as well.  I wasn't sure if they would need a glaze but I thought that they would look better if they had one so I tried it out.  I ate them with and without and the glaze is so good and adds just the right texture and flavor to make these cookies a knock out.  I really recommend using the glaze and not skipping it.  I put it into a piping bag and just quickly piped the glaze onto the cookies but a fork or a spoon would work good too to drizzle it on.  You could also dip the cookies into the glaze if you want to do that as well.  There are lots of options to get the best cookie for you

 If you are a big cinnamon roll fan, then these cookies are a must for you to make.  They might look difficult but if you follow the steps that I laid out and used some of my recommendations then you will be whipping them up in no time.  My advice to all gluten free baking is to be patient and to not rush through steps.  Whenever I do that, I am bound to make a mistake and will have to start over so be patient and go slow until you really get the feel of what you are doing.  Let me know how yours turn out. I love to hear from you guys about all your baking adventures.

Yield: 3 dozen cookies
Author: Kimberly Llewellyn
Gluten Free Cinnamon Roll Cookies

Gluten Free Cinnamon Roll Cookies

If you love a good cinnamon roll, then you will love these cinnamon roll cookies. They are a buttery and delicious sugar cookie rolled up to look just like cinnamon rolls. They taste like them too and you will wow all your friends and family with these amazing cookies.
prep time: 1 H & 30 Mcook time: 14 Mtotal time: 1 H & 44 M

ingredients:

Cookies
  • 3 cups gluten free 1 to 1 flour blend
  • 1 teaspoon baking powder
  • 1 teaspoon kosher salt
  • 1 cup butter, softened
  • 1 cup sugar
  • 1 large egg
  • 1 tablespoon milk
  • 1 teaspoon pure vanilla extract
Filling
  • 2 tablespoons melted butter
  • 1/4 cup packed brown sugar
  • 2 teaspoons cinnamon
Glaze
  • 1 1/4 cups powdered sugar
  • 2 tablespoons milk

instructions:

How to cook Gluten Free Cinnamon Roll Cookies

  1. Heat oven to 350 degrees F. and line two baking sheets with parchment paper. In a large bowl, whisk together flour, baking powder, and salt.
  2. In the bowl of a stand mixer, beat butter and sugar until fluffy and pale in color. Add egg, milk, and vanilla and beat until combined, then add flour mixture gradually until totally combined. Chill for 30 minutes.
  3. Once chilled, divide dough in half and and on a piece of parchment paper, roll each piece of dough into a rectangle about 1/4" thick.
  4. In a small bowl, combine brown sugar and cinnamon. Brush rectangles with melted butter and sprinkle with sugar mixture. Tightly roll up each rectangle into a tight log.  Wrap in plastic wrap and chill for 30 minutes. 
  5. Slice into 1/2"-thick slices and transfer to prepared baking sheets, spaced 1" apart. Bake until lightly golden on the edges, 12-14 minutes.  Let cool.
  6. In a small bowl, combine powdered sugar with milk and place in piping bag and drizzle over cookies or drizzle with fork or spoon over cookies.
  7. Let glaze dry and serve immediately. Store in airtight container.
Did you make this recipe?
Tag @kimberlysglutenfreekitchen on instagram and hashtag it #glutenfreecinnamonrollcookies
Created using The Recipes Generator
January 17, 2020 No comments
We are right in the middle of pumpkin season and I couldn't be happier!  I look forward to this time of year and I absolutely love it.  I have been thinking a lot about pumpkin recipes and what I could do to make something amazing for this year and pumpkin sugar cookies popped into my brain.  I looked them up and low and behold they are a thing! I was so excited to get started on a gluten free version of this cookie and I was not disappointed by the results.  
After I made these cookies, my husband said that they were his new all time favorite cookie.  Now although he is my biggest supported, he is not an easy critic.  He will be honest with me and tell me just what he thinks so when he said they were his new favorite cookie, I was floored.  He asked me to make a batch two weekends in a row because he simply couldn't get enough.  I was happy to oblige because they are so easy! If you read my blog, then you know I love an easy and simple recipe that makes a great tasting dessert.  These are exactly what I love. Not a ton of ingredients and the product is simply perfect. 
These pumpkin sugar cookies are not exactly what you think of when you picture a sugar cookie. These cookies are so soft and cloud-like.  The pumpkin in them gives them such a light and fluffy texture that they are almost cake like.  Even though they are so soft they still hold their shape pretty well and are surprisingly not overly sweet.  I was a little worried when I first attempted this recipe because I was afraid they would be too sweet.  I am really not a fan of overly sweet desserts but these cookies surprised me.  Even though they do have a lot of sugar in them, they are really balanced and the sugar does not over power the other flavors.  I was also a little skeptical about putting a frosting on top of a already sweet cookie but the cream cheese frosting is a perfect addition.  The addition of the cinnamon really completes these cookies and they just wouldn't be the same without the frosting so I highly recommend frosting them.  
These cookies are just perfect for any fall gathering. I already have requests from my family to make these for Thanksgiving this year.  If you love pumpkin, then these are definitely the cookies for you.  This recipe will be added to your favorites and you won't be able to get enough of these delicious pillows of amazingness! Make sure to check out my blog for more great recipes that I am sure you will love!

Yield: 36 cookies
Author: Kimberly Llewellyn

Gluten Free Pumpkin Sugar Cookies

Gluten Free Pumpkin Sugar Cookies

These cookies are soft and fluffy and full of pumpkin flavor. Topped with a cinnamon cream cheese frosting and these cookies will become a favorite!
prep time: 25 Mcook time: 15 Mtotal time: 40 M

ingredients:

Cookies
  • 2 1/4 cups of Gluten Free 1 to 1 Flour Blend
  • 1 teaspoon baking powder
  • 1 teaspoon pumpkin pie spice
  • 1/2  teaspoon kosher salt
  • 1 cup butter, softened
  • 1 1/2 cup granulated sugar, plus more for rolling
  • 1/2 cup canned pumpkin puree
  • 1 large egg
  • 2 teaspoons pure vanilla extract
Frosting
  • 1 (8-oz) block cream cheese, softened
  • 2 cups powdered sugar
  • 1 teaspoon pure vanilla extract
  • 1/4 teaspoon ground cinnamon

instructions:

How to cook Gluten Free Pumpkin Sugar Cookies

  1. Preheat the oven to 350 degrees F.  and line two large baking sheets with parchment paper. In a medium bowl, whisk together gluten free flour blend, baking soda, pumpkin pie spice, and salt.
  2. In the bowl of a mixer, beat butter, sugar, pumpkin, egg, and vanilla until combined. Add dry ingredients and stir until just combined. 
  3. Scoop a tablespoon of cookie dough and drop into the sugar.  Roll the cookie dough into the sugar making sure it is completely covered.  Transfer to prepared baking sheet and repeat with remaining dough, spacing cookies 2 inches apart.  Flatten each of the cookies with the back of a spoon or fingers to makes sure they are flat. 
  4. Bake until cookies are lightly golden, about 12-15 minutes. Let cool completely.
  5. Meanwhile, make frosting: In a large bowl, beat all ingredients until smooth and creamy. Frost the top of each cookie with cream cheese frosting.
Created using The Recipes Generator
November 16, 2019 No comments
I love a good lemon bar.  I think they are so crisp and delicious and can really be made and eaten anytime of the year.  They are just so light and tart and are just perfect for any occasion.  I was dreaming about lemon bars one day and thought about the possibility of adding strawberries to it to make strawberry lemonade bars. Well, after some thought, I was able to come up with this amazing recipe.  I was so happy with how they turned out and they really exceeded my expectations.  I think this is now my favorite way to eat lemon bars.  The strawberries add so much and they are absolutely delicious.  I made these for a party and I was really sad at the end of the night that there were none for me to take home.  I was really looking forward to having leftovers but they were just too good for people to leave behind.
I love real and fresh flavors and these bars are just full of fresh strawberry and lemon.  They are just bursting with real strawberries and tons of lemon juice and lemon zest to give them the perfect flavor.  The strawberries also give them such a pretty pink color so they look just like strawberry lemonade bars should look.  

The crust is the perfect shortbread crust that is so easy and simple to make.  It takes only a few ingredients to whip it up and is the perfect base for these bars.  The crust creates great structure but the buttery and flaky crust just melts in your mouth.  It is just a great support for the flavors in the filling but gives the bars the stability they need to be cut into nice and even bars for serving.  

The filling is simple but packed full of the flavors that you want without anything artificial.  I am really not a fan of artificial flavoring and this recipe has none of it.  It has just the right amount of lemon to make it tart but the strawberries give it that sweetness so you don't really need a ton of sugar.  I actually decreased the amount of sugar that I originally had for them because I didn't want them to be overly sweet and take away from the lemon and strawberry.  I was really happy that I did because they ended up turning out perfect.  They had the perfect balance of sweet and tartness and nothing was too overpowering.  

I highly recommend giving these delicious bars a try especially if you love strawberry and lemon as much as I do.  They are not hard to make a perfect to make if you are new to gluten free baking.  Make sure you are using fresh ingredients and your bars will turn out perfect. Also, f you are just in the mood for lemon bars without the strawberry, check out my Gluten Free Lemon Bars.
Yield: 24 servings
Author: Kimberly Llewellyn

Gluten Free Strawberry Lemonade Bars

Gluten Free Strawberry Lemonade Bars

If you love lemon bars then you are going to love these strawberry lemonade bars! They are full of strawberry and lemon flavor and taste just like your favorite drink.
prep time: 15 Mcook time: 1 hourtotal time: 1 H & 15 M

ingredients:

Crust
  • 1 cup butter, softened
  • 1/2 cup sugar
  • 2 cups 1 to 1 gluten free flour blend (I use Bob's Red Mill 1 to 1 Gluten Free Flour Blend)
Strawberry Lemonade Filling
  • 4 eggs, beaten
  • 1 cup sugar
  • 3 tablespoons 1 to 1 gluten free flour blend
  • 1 1/2 cups strawberry
  • 2 tablespoons lemon zest
  • 2/3 cup fresh lemon juice
  • 1/3 cup milk

instructions:

How to cook Gluten Free Strawberry Lemonade Bars

  1. Preheat oven to 350 degrees F. Line a 9x13 inch pan with parchment paper. 
  2. Make the crust. In a medium bowl, blend together softened butter, 2 cups gluten free flour and 1/2 cup sugar. Press into the bottom of 9x13 inch pan.
  3. Bake for 15 to 20 minutes in preheated oven, or until firm and golden.
  4. Allow crust to cool while you prepare the filling  and reduce the oven temperature to 325 degrees F. 
  5. Make the strawberry lemonade filling. Combine the eggs, sugar,  and gluten free flour.  In a blender or food processor, blend strawberries, lemon zest, lemon juice, and milk until well combined. 
  6. Pour the blended mixture into the egg mixture and stir well.  Pour the filling over the partially baked crust and immediately put the pan into the oven.
  7. Bake at 325 degrees F. for 45 minutes or until it doesn't jiggle when you shake the pan.  Allow to cool for 30-45 minutes and cut into squares and sprinkle with powdered sugar. 
Created using The Recipes Generator
October 19, 2019 No comments
Older Posts

Gluten Free Websites

  • Gluten Free Resource Directory

About Me

About Me

My name is Kimberly and ever since my diagnosis about 12 years ago, I have been on a mission to find great gluten free products and develop amazing recipes that everyone will love.

Follow Me

Gluten Free Christmas Cookies

Awards

Gluten Free Youtube Channels

Popular Posts

  • Gluten Free Cinnamon Rolls
    Waking up to the smell of cinnamon rolls in the oven is something that no one should ever be denied. I tried for years to master gluten free...
  • Gluten Free Monkey Bread
    Monkey bread was something that I missed so much after going gluten free.  I looked for years to try and find a good recipe but nothing seem...
  • Gluten Free Christmas Pinwheel Cookies
    Christmas is a time for treats, treats and treats! We seem to overindulge during this holiday season and just because you are gluten free, i...

recent posts

Labels

Appetizers Baking Recipes breakfast Cakes Christmas Cookies Cooking Recipes Dinners Pie product reveiws Pumpkin Videos

1

Report Abuse

FOLLOW ME @INSTAGRAM

Created with by ThemeXpose