Powered by Blogger.
  • Home
  • Recipes
    • Baking Recipes
    • Dinners
    • Holidays
  • Product Reviews
youtube facebook Pinterest google twitter instagram

Kimberly's Gluten-Free Kitchen

I'm back! It has been so long since I have done a post and it feels good to get back at it. I have been taking some classes these past few months and since my kids, along with all of yours, are home right now, it made doing anything extra impossible. As soon as I took my last final, I couldn't wait to get into the kitchen. I have been dreaming about what I was going to make and I came up with these scrumptious Christmas cookies.  They are everything good and delicious about Christmas packed into one cookie. They have gluten free chocolate sandwich cookies, mini marshmallows and crushed candy canes. They taste amazing and they are just packed with delicious Christmas flavors.
I don't know about you but I have lots of helpers in my kitchen. The minute my kids hear the mixer start, they all run into the kitchen and want to help. Sometimes I love it and sometimes all I want to do is hide in my kitchen and bake just the way that I want to. My kids especially love to help during the holidays and that gets hard when there is so much baking to do. I thought these cookies would be perfect to have a little extra help with.  Kids will love making these cookies and they aren't too hard to make with little helpers. My kids loved helping me crush the cookies and candy canes and thought that was just the best. The candy canes make them look like Christmas cookies without getting tubs of frosting out and having frosting from one end of the house to the other. These are simple but delicious Christmas cookies that are just as much fun to eat as they are to make!

I have seen a version of these cookies with white chocolate chips in them and that would be great to add instead of the marshmallows if you are a white chocolate fan. I just never got on the white chocolate band wagon so I thought that mini marshmallows would be so fun and it would make them nice and gooey. I was so right! The marshmallows melted in the oven and just gave the perfect amount of ooey gooey to these cookies. The marshmallows do make them spread a little bit in the oven so when I took them out, I just used a knife to bring them back together. 
I love the idea of a cookie within a cookie. I thought the gluten free chocolate sandwich cookies would be so good in these. They add a bit of chocolate to them and some fun texture. They just made the perfect addition along with the candy canes. It is just a subtle peppermint flavor to make them really feel like Christmas. The vanilla pudding mix makes these cookies so soft and delicious but they still hold their shape and are sturdy. I think these cookies are the absolute perfect Christmas cookie. I really couldn't think of another name for them because they just remind me of Christmas. Check out the video to see exactly how I made them!
Gluten Free Christmas Cookies
Print

Gluten Free Christmas Cookies

Yield: 36 cookies
Author: Kimberly Llewellyn
Prep time: 15 MinCook time: 12 MinTotal time: 27 Min
These Christmas cookies are packed with all things that Santa loves. They have marshmallows, chocolate sandwich cookies and candy canes. They are sure to be a hit during the holidays and the best thing is that they are gluten free for all to enjoy!

Ingredients

  • 1 cup unsalted butter, softened
  • 3/4 cup brown sugar
  • 1/4 cup granulated sugar
  • 1/4 cup vanilla pudding mix
  • 2 large eggs
  • 1 teaspoon pure vanilla extract
  • 2 1/2 cups 1 to 1 gluten free flour blend
  • 1 teaspoon baking soda
  • 1/2 teaspoon salt
  • 1 cup chopped gluten free chocolate sandwich cookies
  • 1 cup mini marshmallows
  • 1/2 cup crushed candy canes

Instructions

  1. Preheat oven to 350 degrees F. Line a baking sheet with parchment paper.
  2. In the bowl of your mixer,  add butter and sugars. Beat until creamy, about 2 minutes. Add vanilla pudding mix, eggs and vanilla.
  3. In a medium bowl add the gluten free flour, baking soda and salt. Whisk together until combined.
  4. Add the dry ingredients slowly to the wet ingredients until fully combined. Stir in gluten free chocolate sandwich cookies, mini marshmallows, and crushed candy canes.
  5. Drop cookie dough in rounded tablespoons onto prepared baking sheet. Bake for 10-12 minutes until slightly golden along the edges of the cookies. Remove cookies from oven and let cool slightly before removing and transferring to a cooling rack to cool completely. 
  6. Serve and enjoy. Store in airtight container.
Did you make this recipe?
Tag @kimberlysglutenfreekitchen on instagram and hashtag it #glutenfreechristmascookies
Created using The Recipes Generator
December 15, 2020 1 comments
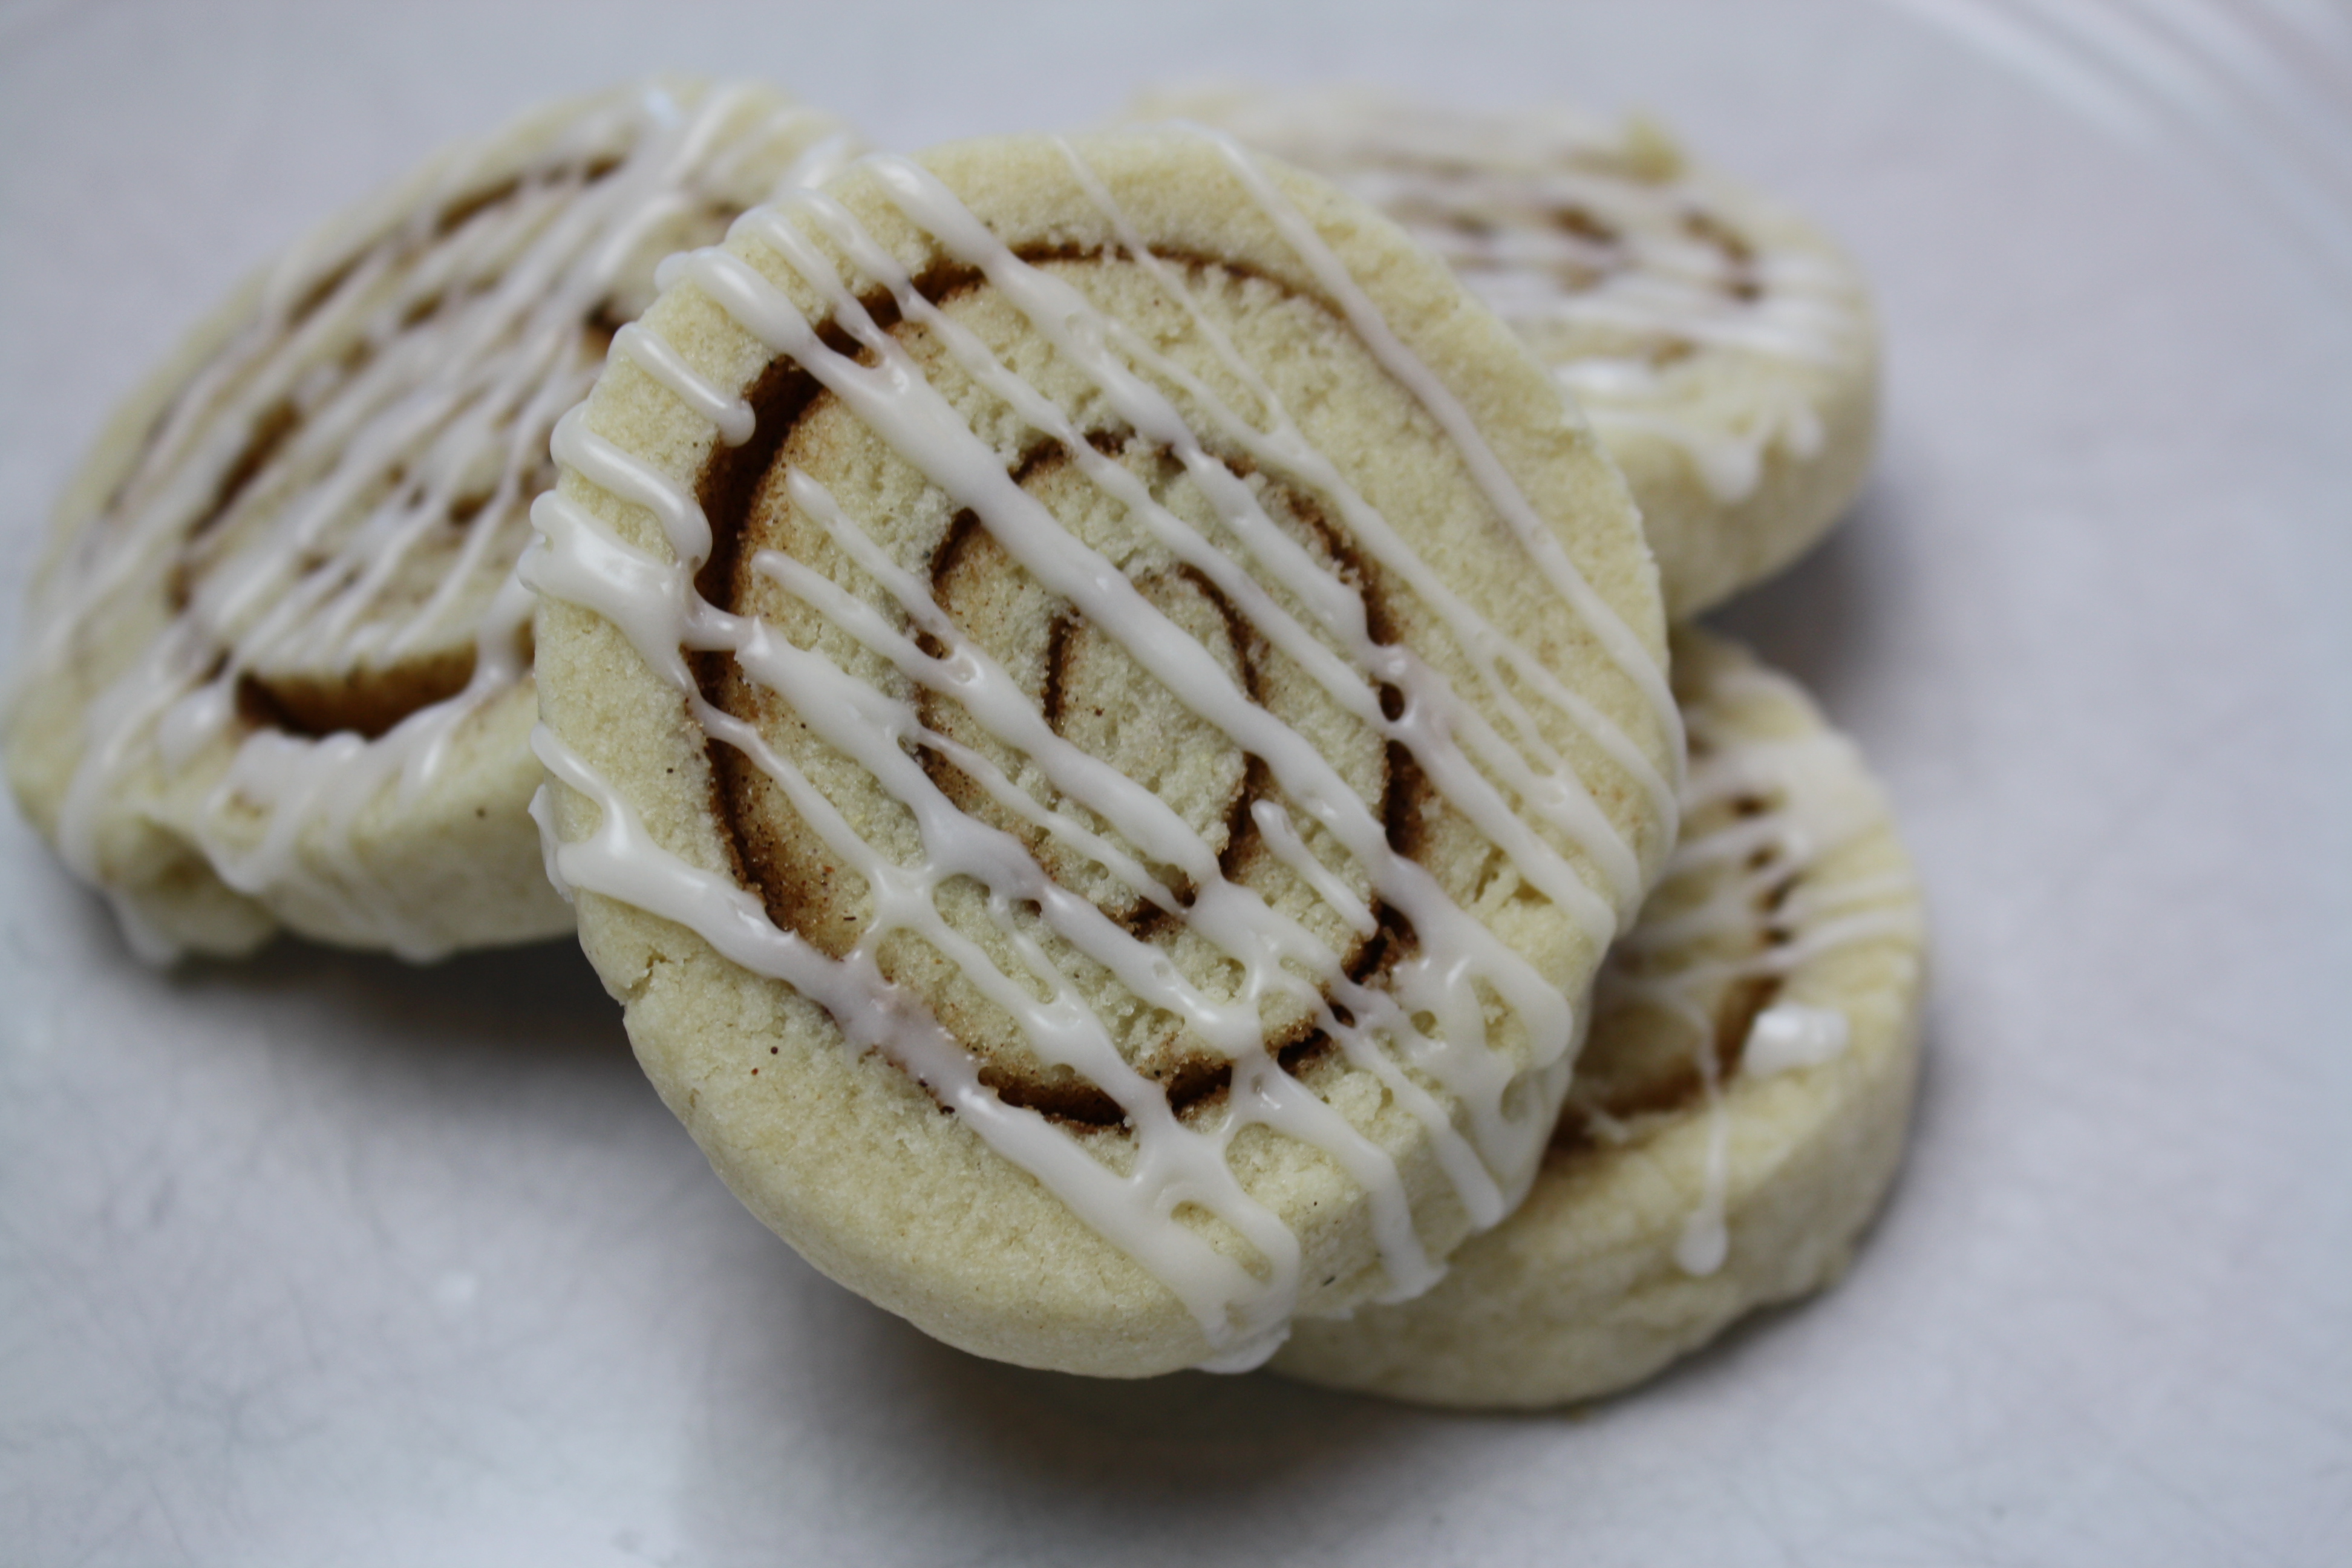
I am a huge fan of cinnamon rolls.  One of my very favorite memories growing up was that when we were shopping at the mall, my mom and I would always stop by Cinnabon and get a cinnamon roll to share.  It was just the two of us and I loved that time together.  Well, the days of getting cinnamon rolls in the mall are long over for the both of us as we both have Celiac but that hasn't altered my love of them.  One of the first things that I wanted to conquer when I decided to start a blog was cinnamon rolls.  I am pretty happy with my recipe that I created a few years ago and if you are looking for a good one my gluten free cinnamon roll recipe is absolutely delicious.  I just love the flavors and when I was thinking about cookies for the holidays, I thought a cinnamon roll cookie would be perfect. 
If you have worked a lot with gluten free flour then you know that it is not as strong or as workable as regular wheat flour.  Gluten is what makes the wheat flour so stretchy and strong so when you are trying to work without that gluten, it can make things quite difficult.  Sometimes it can break easily, fall apart to just disintegrate in your hands. (I have had all those happen to me.) I wanted to make sure this dough would hold up and would work when you tried to roll it up because I wanted them to look like a cinnamon roll.  I was really pleased with how these turned out.  They have a great swirl and it wasn't too difficult to roll them up.  In this recipe you need to chill the dough twice and you really don't want to skip those steps.  Chilling the dough keeps it firm for when you are rolling it out and cutting them out.  You really want the dough to hold it's shape so that it is easier to work with. I also rolled them out on a piece of parchment paper which I really recommend doing.  It made it much easier it roll up and I used parchment paper to get a tight roll.  If you just rolled them out on the counter, it might not work and you might be stuck with a very big mess.  Just watch the video down below if you need any help with that part.  
The glaze for this cookie really makes a big difference as well.  I wasn't sure if they would need a glaze but I thought that they would look better if they had one so I tried it out.  I ate them with and without and the glaze is so good and adds just the right texture and flavor to make these cookies a knock out.  I really recommend using the glaze and not skipping it.  I put it into a piping bag and just quickly piped the glaze onto the cookies but a fork or a spoon would work good too to drizzle it on.  You could also dip the cookies into the glaze if you want to do that as well.  There are lots of options to get the best cookie for you

 If you are a big cinnamon roll fan, then these cookies are a must for you to make.  They might look difficult but if you follow the steps that I laid out and used some of my recommendations then you will be whipping them up in no time.  My advice to all gluten free baking is to be patient and to not rush through steps.  Whenever I do that, I am bound to make a mistake and will have to start over so be patient and go slow until you really get the feel of what you are doing.  Let me know how yours turn out. I love to hear from you guys about all your baking adventures.

Yield: 3 dozen cookies
Author: Kimberly Llewellyn
Gluten Free Cinnamon Roll Cookies

Gluten Free Cinnamon Roll Cookies

If you love a good cinnamon roll, then you will love these cinnamon roll cookies. They are a buttery and delicious sugar cookie rolled up to look just like cinnamon rolls. They taste like them too and you will wow all your friends and family with these amazing cookies.
prep time: 1 H & 30 Mcook time: 14 Mtotal time: 1 H & 44 M

ingredients:

Cookies
  • 3 cups gluten free 1 to 1 flour blend
  • 1 teaspoon baking powder
  • 1 teaspoon kosher salt
  • 1 cup butter, softened
  • 1 cup sugar
  • 1 large egg
  • 1 tablespoon milk
  • 1 teaspoon pure vanilla extract
Filling
  • 2 tablespoons melted butter
  • 1/4 cup packed brown sugar
  • 2 teaspoons cinnamon
Glaze
  • 1 1/4 cups powdered sugar
  • 2 tablespoons milk

instructions:

How to cook Gluten Free Cinnamon Roll Cookies

  1. Heat oven to 350 degrees F. and line two baking sheets with parchment paper. In a large bowl, whisk together flour, baking powder, and salt.
  2. In the bowl of a stand mixer, beat butter and sugar until fluffy and pale in color. Add egg, milk, and vanilla and beat until combined, then add flour mixture gradually until totally combined. Chill for 30 minutes.
  3. Once chilled, divide dough in half and and on a piece of parchment paper, roll each piece of dough into a rectangle about 1/4" thick.
  4. In a small bowl, combine brown sugar and cinnamon. Brush rectangles with melted butter and sprinkle with sugar mixture. Tightly roll up each rectangle into a tight log.  Wrap in plastic wrap and chill for 30 minutes. 
  5. Slice into 1/2"-thick slices and transfer to prepared baking sheets, spaced 1" apart. Bake until lightly golden on the edges, 12-14 minutes.  Let cool.
  6. In a small bowl, combine powdered sugar with milk and place in piping bag and drizzle over cookies or drizzle with fork or spoon over cookies.
  7. Let glaze dry and serve immediately. Store in airtight container.
Did you make this recipe?
Tag @kimberlysglutenfreekitchen on instagram and hashtag it #glutenfreecinnamonrollcookies
Created using The Recipes Generator
January 17, 2020 4 comments
Sugar cookies are a must in my house during Christmas.  My kids look forward all year until they get to help me make the sugar cookies and then decorate them.  I was having a really hard time finding a good sugar cookie recipe that held it's shape. It seemed that no matter what I did the sugar cookies just spread and lost their shape too much and became a big blob. It was always so disappointing because we cut out these cute shapes and then after baking them, they just looked so ugly.  Well, no more! These sugar cookies are perfect and hold their shape with no problem and minimal chilling time.

Not only did they turn out perfect after baking but they tasted so good.  The sugar ratio is just right and they are not too sweet.  I am not a fan of super sweet sugar cookies because you always add frosting or icing to them so you don't want the cookie itself to be too sweet. These are just right and even without frosting, they are so good.  This is also coming from someone who really isn't a fan of sugar cookies. They just aren't my favorite but since my boys love to decorate them so much I put up with them but these cookies I found myself not being able to stop eating them!
So for the frosting part, I wanted to demonstrate how to make them look extra pretty.  My sister in law, Katie Pinson, went to culinary school and then worked as a pastry chef for a few years so she was the perfect person to come and help show how to decorate them properly. I didn't want her to do anything too fancy because I wanted the rest of us to be able to do them and she delivered.  Not only did they turn out beautiful but they were not hard! After I watched her do it, I was able to go and decorate some of them myself and they didn't turn out half bad.
She used the flooding technique and it was quite simple to do. You want to make sure that the frosting is the right consistency.  As you add the water keep checking on it to make sure that you don't add too much.  If you do, just add a bit more sugar.  You want the icing to melt back into itself a few seconds after its drizzled.  The video down below demonstrates what the right consistency should be. When you are done making it, they just add the colors that you want.  She showed how to use it in a piping bag as well as the squeeze bottles.  She said that you get more of a precise line with the piping bag but the squeeze bottles are so convenient, especially when doing this with children. I could see the benefit to using both but I will for sure be using the squeeze bottles when I decorate with my own children.  They are a lot easier to use.
You can also use sprinkles or any other decorations that you want with this icing to make them extra fun.  After you are done decorating them let them dry overnight before serving.  Another reason that I loved these so much was that they weren't very messy.  Regular frosted cookies turn  into a disaster with my kids but these were fairly tidy especially after they dried.  I also like that the frosting isn't too thick.  With a thin layer on top, it added just the right amount of sweetness.
I hope that you all give these a try because they are so fun and so good!  Also, don't be put off by the thought of doing royal icing because if I can do it, so can you! Decorating is not my strength but they turned out so cute and I bet Santa will be really happy to be eating these when he comes down our chimney.  Make sure to check out my YouTube channel for more great recipes and product reviews and make sure to watch the video down below to find out exactly how to make and frost these cookies.


print recipe

Gluten Free Sugar Cookies
by Kimberly Llewellyn December-16-2017
These sugar cookies not only taste great but they hold their shape as well so you can have fun cut out cookies for any season.
Ingredients
  • 3 cups gluten free flour blend (I use Bob's Red Mill Gluten Free 1 to 1 Flour Blend)
  • 1/2 teaspoon salt
  • 2 teaspoon baking powder
  • 2 sticks unsalted butter at room temp.
  • 1 cup granulated sugar
  • 2 teaspoons pure vanilla extract
  • 1/2 teaspoon almond extract
  • 1 egg
Instructions
1. Cream butter and sugar together for 3 minutes until light and fluffy.2. Add egg and vanilla and almond extracts to butter and sugar mixture.3. Sift together flour, salt and baking powder. Slowly add to wet ingredients. Mix until dough forms a ball. Wrap dough in plastic wrap and chill for 30 minutes.4. Roll out dough making sure to dust with gluten free flour to prevent sticking. 5. Use your favorite cookie cutters to cut out desired shapes and place on parchment lined cookie sheet. Bake in preheated 350 degree F. oven for 8 minutes. Do not over bake. 5. Cool completely before decorating. Decorate with your favorite frosting or royal icing.6. Store in air tight container.
Details
Prep time: 45 mins Cook time: 8 mins Total time: 53 mins Yield: 3 dozen cookies


print recipe

Royal Icing
by Katie Pinson December-16-2017
Royal icing is the perfect way to get flawless and beautiful sugar cookies.
Ingredients
  • 2 large egg whites (2 oz or 1/4 cup)
  • 2 teaspoons lemon juice
  • 3 cups sifted powdered sugar
  • water, as needed
  • food coloring
Instructions
1. Whisk egg whites and lemon juice together until frothy.2. Whisk in sifted powdered sugar to egg whites a little at a time until combined. The mixture will be stiff. 3. To use flooding technique, add water a little at a time.You want the icing to melt back into itself a few seconds after it is drizzled. (If you thin it out too much you can always add more powdered sugar.)4. Separate frosting in different bowls and add food coloring to get the desired colors. Add frosting to piping bags or plastic squeeze bottles and apply to cookies using a toothpick to get out any air bubbles and smooth the frosting evenly across the cookie.5. Let frosting dry overnight before serving and store in airtight container.
Details
Prep time: 30 mins Cook time: Total time: 1 hour Yield: enough to frost 3 dozen cookies
December 16, 2017 7 comments
Christmas is a time for treats, treats and treats! We seem to overindulge during this holiday season and just because you are gluten free, it shouldn't exclude you from acting just as everyone else.  Christmas cookies are a big deal in my house and even though I am the only one in my family that is gluten free, everything that I make is gluten free.  I wanted to find some fun cookies to make with my kids but the pinwheel cookies just seemed too far to reach.  Gluten free cookie dough can be super brittle and it is not easy to roll.  I just marked it down as it was never going to happen which is probably a good thing because I am not good at taking that.  I became determined to find a way to make these tasty treats and I did!
 Now, to be honest, they didn't work the first time.  It turned into a crumpled mess and me thinking that I was right before in that these really can't be made with gluten free flour. My seven year old was with me when I was making them and he encouraged me to keep going and try again.  I could not argue with that so I went back in with a different plan. Using plastic wrap while rolling it and chilling it after it has been rolled is a must.  The dough is so much easier to work with before it is chilled and the plastic wrap gives the dough support so it doesn't crumble.
After I rolled it, I must admit that I did a little dance to celebrate getting through the hardest part of these cookies! I conquered them and not only that but they turned out so cute! My kids loved them and well so did my husband.  These really are the perfect Christmas cookie.  They are so cute and I think I did hear that Santa was going gluten free so making them for him would be the perfect treat!
Don't be scared to try these because I really did all the work for you. I was able to figure out a way to make these that actually work and taste great. Watch the video down below so that you understand exactly how I was able to roll these up.  Make sure you read your labels and find a food dye that is gluten free.  A lot of food dyes can have cross contamination so just make sure you find one that is safe.  There is a link below of a food dye that is gluten free so pick that one up if you can't find another one.  Also, make sure to check out my YouTube channel for more great recipes and product reviews.

print recipe

Gluten Free Christmas Pinwheel Cookies
by Kimberly Llewellyn December-11-2017
Super fun and colorful Christmas swirl cookies. They are a festive holiday treat that'll be the star of your Christmas cookie plate!
Ingredients
  • 3 cups gluten free flour blend (I use Bob's Red Mill Gluten Free 1 to 1 Baking Flour)
  • 1/2 teaspoon salt
  • 2 teaspoons baking powder
  • 1 cup unsalted butter
  • 1 1/2 cups granulated sugar
  • 2 teaspoons pure vanilla extract
  • 1/2 teaspoon almond extract
  • 1 egg
  • 1/2 teaspoon red food coloring
  • 1/2 teaspoon green food coloring
Instructions
1. Cream butter and sugar together for 3 minutes until light and fluffy.2. Add egg and vanilla and almond extracts to butter and sugar mixture.3. Sift together flour, salt and baking powder. Slowly add to wet ingredients. Mix until dough forms a ball.4. Cut dough into 3 equal parts. 5. To one piece of dough, add the red food coloring. Beat with your mixer until the color is completely incorporated. Clean mixer and paddle.6. To the second piece of dough, add the green food coloring. Beat with mixer until the color is completely incorporated.7. Leave the third piece as is.8. Cut a long piece of plastic wrap and lay down on a hard surface. Take red dough ball and place on plastic wrap. Roll out into a large rectangle. 9. Next, roll the plain (uncolored) dough into the same size rectangle onto either another piece of plastic wrap or a flexible cutting board. Make sure to flour liberally so nothing sticks. Flip over dough on top of red dough.10. Repeat with the green dough, laying it on top of the plain dough. If needed, use a pizza cutter to trim two of the edges so they are even. (Don't worry about the other two sides.)11. Very carefully, starting with one of the straightened edges, roll the dough into a long shape, using the plastic wrap as support (See video!). Roll until you reach the other trimmed side. Once the dough log is complete, wrap in plastic wrap and chill for at least 1 hour.12. Preheat you oven to 350 degrees F. Line a baking sheet with parchment paper or a silicone mat.13. Use a sharp knife to cut the dough log into 1/4-inch thick slices.(Discard the ends since they don't make a nice pinwheel design). Place the cookies on your prepared baking sheets and bake for 8-10 minutes making sure to not over bake.14. Remove from oven and let cool for 5 minutes before transferring to wire rack to cool completely.15. Serve immediately or store in an airtight container until ready to serve.
Details
Prep time: 2 hour Cook time: 8 mins Total time: 2 hour 8 mins Yield: 2 dozen cookies
December 11, 2017 2 comments
Older Posts

Gluten Free Websites

  • Gluten Free Resource Directory

About Me

About Me

My name is Kimberly and ever since my diagnosis about 12 years ago, I have been on a mission to find great gluten free products and develop amazing recipes that everyone will love.

Follow Me

Awards

Gluten Free Youtube Channels

Popular Posts

  • Gluten Free Sugar Cookies with Royal Icing
    Sugar cookies are a must in my house during Christmas.  My kids look forward all year until they get to help me make the sugar cookies and t...
  • Gluten Free Christmas Pinwheel Cookies
    Christmas is a time for treats, treats and treats! We seem to overindulge during this holiday season and just because you are gluten free, i...
  • Gluten Free Cinnamon Rolls
    Waking up to the smell of cinnamon rolls in the oven is something that no one should ever be denied. I tried for years to master gluten free...

recent posts

Labels

Appetizers Baking Recipes breakfast Cakes Christmas Cookies Cooking Recipes Dinners Pie product reveiws Pumpkin Videos

1

Report Abuse

FOLLOW ME @INSTAGRAM

Created with by ThemeXpose